A sewing machine can look sturdy while having several parts that are vulnerable during a move. Its weight sits close to delicate controls, thread guides, spool pins, and, on some models, an embroidery carriage. A carrying bag may make the machine easier to handle, but it still needs protection against shifting and pressure.
Packing sewing machines starts with identifying the exact model, checking its transport instructions, and choosing packaging that supports the machine without pressing against fragile components. Preparation should also account for detachable accessories, the foot controller, and any cabinet or table attached to the equipment.
Whether your machine is travelling directly to a new home or spending time in storage, the following checks can help you prepare it for the journey.
Check the Instructions for Your Exact Model
Find the model number on the machine and locate its instruction manual. Look for sections covering repacking, transportation, carrying, or storage.
A basic mechanical machine may have different requirements from a computerized sewing-and-embroidery model. The correct position for a needle, presser foot, or embroidery carriage should come from the instructions for that equipment.
Before beginning, establish which attachments should be removed, whether transport supports are required, and how the machine should be lifted. A repacking diagram can be particularly useful because it shows where supporting inserts and accessories belong.
Avoid dismantling internal mechanisms to make the machine easier to pack. Removing covers or adjusting components without instructions can create problems before moving day.
Record Its Condition Before Disconnecting It
Photograph the machine while it is still set up. Include the casing, controls, screen, spool pins, handwheel, and accessory connections.
Record the model and serial number somewhere you can access without opening the packed box. Note any existing cracks, loose controls, or damage to the carrying handle.
For a working machine, sew a short sample using ordinary settings and keep it with your records. This provides a useful reference if you notice a change in stitching after delivery.
If the machine already skips stitches or makes unusual noises, consider having it assessed before the move. Otherwise, it may be difficult to determine whether a problem developed during transport.
Prepare the Needle Area and Thread Path
Switch the machine off and unplug it before handling the needle or removing accessories.
Remove any fabric from beneath the presser foot. Take off thread spools that could unwind or place pressure on a spool pin, and follow the manual when clearing the thread path or removing the bobbin.
Check whether the transport instructions call for needle removal or a particular needle position. If you remove the needle, place it in a secure needle case rather than loose inside an accessory bag.
Keep the needle-clamp screw in its proper location unless the instructions say otherwise. Small screws are easily lost when several accessories are packed together.
Do not use the needle bar, thread guides, or presser-foot assembly as attachment points for packing straps.
Pack Detachable Accessories in Separate Compartments
A foot controller or extension table can damage the casing if it moves around beside the machine.
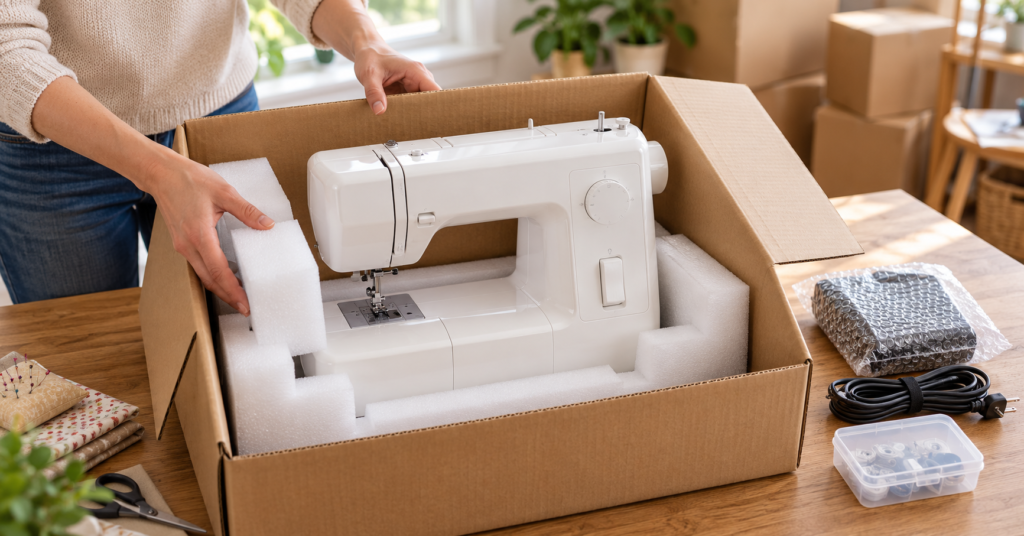
Remove detachable accessories as directed and give them protected compartments. Depending on your setup, these may include:
- Foot controller and detachable power cable.
- Extension table.
- Embroidery hoops.
- Removable spool holders.
- Knee lifter.
- Spare presser feet.
- Bobbins and maintenance tools.
Label the controller and power supply with the machine model, especially if you own more than one machine. Similar-looking connections do not establish that accessories are interchangeable.
Coil cables loosely without sharp bends near the plugs. Place small tools in a closed container so they cannot escape into the cushioning.
If you use the machine’s built-in accessory compartment, check that it closes securely and that its contents cannot spill during handling.
Give an Embroidery Unit Its Own Preparation Step
A detachable embroidery unit requires more attention than an ordinary accessory tray. Its carriage and connecting points should not carry the weight of other belongings.
Check the instructions for its packing position before switching off or detaching the unit. Some machines use an electronic function to move the carriage into a position suitable for their original inserts.
Do not push the carriage by hand to make it fit a box unless the manufacturer explicitly permits that action.
Arrange cushioning around the unit’s intended supporting surfaces. Keep hoops and other accessories from pressing against the moving arm or connector.
Photograph the prepared unit before closing its packaging. This can help you remember where protective pieces were placed when you unpack.
Inspect Original Packaging Before Reusing It
Original packaging can be useful because its inserts were shaped for the machine. However, an old carton needs inspection before another journey.
Look for softened cardboard, split seams, crushed corners, and broken inserts. Confirm that the packaging belongs to your exact machine and that all supporting pieces are present.
An insert from a different model may appear to fit while leaving important areas unsupported. Likewise, a damaged bottom insert may no longer hold the machine securely.
Follow the repacking diagram when placing accessories. Adding scissors, fabric, or extra tools to unused-looking spaces can change how the packaging fits and put pressure on the equipment.
Support the Machine Properly When the Original Box Is Missing
Choose a strong carton rated for the packed weight and large enough to accommodate protective cushioning.
The bottom support deserves particular attention because the machine is heavy relative to its size. A thin layer of crumpled paper may compress beneath it and leave the base poorly protected.
Use cushioning suitable for the machine’s weight. Protect finished surfaces with a clean, nonabrasive layer, then arrange support around appropriate structural areas.
Avoid concentrated pressure against screens, control knobs, spool pins, thread guides, the handwheel, or accessory sockets.
Fill spaces so the machine cannot slide, but do not force the carton closed over its highest point. Loose-fill material alone may be unsuitable because a heavy machine can settle through it.
For valuable, unusually heavy, or awkwardly shaped equipment, have the packing arrangement assessed before transport.
Assess the Carrying Case and Lifting Points
A soft bag can help with carrying and surface protection, but assess whether it offers enough protection for the planned journey.
A hard cover that sits over the machine may leave the base exposed or provide no internal restraint. Check whether the case was designed for carrying, storage, or transport with other belongings.
Inspect handles, hinges, latches, and the case bottom. An aging handle should not be assumed capable of supporting a heavy vintage machine.
Use the lifting points specified in the manual. Where appropriate, support the base instead of relying entirely on the handle. Never lift by a detachable table or another component that was not designed to bear the machine’s weight.
Make a Separate Plan for Cabinet and Industrial Machines
A machine installed in a cabinet or industrial table needs a different plan from a portable domestic model.
Do not assume a hinged machine head can remain unsecured inside its cabinet during loading. Check how the head, table, motor, pedal, and any oil reservoir should be prepared.
Heavy industrial equipment may require trained handling and suitable lifting equipment. Establish who will prepare it and who will move it before pickup.
For an older cabinet, inspect its hinges, legs, and internal supports. Furniture that safely holds a stationary machine may behave differently when lifted or tilted.
Confirm Placement During Moving and Storage
Tell the mover that the carton contains a sewing machine and provide its packed weight when known. Confirm its intended orientation and loading position.
Mark the carton with handling instructions and include it in your inventory. Suitable restraint and careful placement remain necessary even when the box is clearly labelled.
If the machine will enter storage, ensure it is clean and dry first. Follow its maintenance instructions rather than adding oil as a general precaution; lubrication requirements vary.
Keep the carton away from possible water exposure and avoid placing heavy containers above it. For computerized equipment, check the manufacturer’s environmental limits when choosing storage conditions.
Inspect the Machine Before Sewing Again
Open the carton on a stable surface and photograph visible packaging damage before removing the contents.
Check the casing, controls, connectors, and accessories against your inventory. Remove transport supports and packing materials as directed before operating the machine.
If the equipment arrived cold, allow it to reach room temperature and ensure it is free of condensation before plugging it in.
Reinstall accessories, fit the appropriate needle, thread the machine, and try a short sample on scrap fabric. Compare its operation with your earlier sample.
Stop if you notice grinding, unexpected resistance, an electrical smell, or visible damage. A careful arrival check gives you an opportunity to identify a problem before beginning a project or putting further strain on the machine.
Note: This article provides general packing information for household moves. Sewing-machine transport requirements vary by model. Follow your manufacturer’s instructions and confirm packing, handling, and coverage arrangements with your mover. Cabinet-mounted, industrial, and unusually heavy machines may require specialist preparation.